I Whipped a Freezing Cold Can of Evaporated Milk Instead of Heavy Whipping Cream

I Whipped a Freezing Cold Can of Evaporated Milk Instead of Heavy Whipping Cream — 10 Minutes Later, This Is What Happened
In the world of baking and dessert making, heavy whipping cream is often considered irreplaceable. Its rich fat content allows it to transform into soft, fluffy peaks that add elegance to everything from cakes and pies to hot chocolate and fresh fruit. But what happens when you’re ready to make a dessert and discover there’s no heavy cream in the refrigerator?
That was exactly the situation I found myself in one afternoon. Instead of rushing to the store, I looked through my pantry and spotted a can of evaporated milk. I’ve used evaporated milk in countless recipes before—custards, sauces, casseroles, and even coffee—but I’d never attempted to whip it like cream.
Curiosity took over. Could this humble pantry staple really become a light and airy whipped topping? There was only one way to find out.
Why Evaporated Milk?
Evaporated milk is regular milk that has had approximately 60 percent of its water removed through a heating process. The result is a concentrated, creamy product with a rich flavor and a long shelf life.
Unlike heavy cream, evaporated milk contains significantly less fat. Heavy cream typically contains around 36% milk fat, while evaporated milk contains only about 6% to 8%. Since fat plays a major role in creating stable whipped cream, most people assume evaporated milk simply won’t work.
However, many experienced home cooks know an old kitchen trick: if evaporated milk is chilled extremely well, it can trap air and create a surprisingly fluffy texture.
Preparing for the Experiment
I wanted to give the evaporated milk every possible advantage.
Step 1: Freeze the Can
I placed an unopened can of evaporated milk in the freezer for about 30 minutes. The goal wasn’t to freeze it solid but to make it ice cold.
Step 2: Chill the Equipment
Next, I placed my mixing bowl and beaters in the freezer for 15 minutes.
Professional bakers often chill their equipment when whipping cream because colder temperatures help stabilize the mixture and allow more air to be incorporated. Since evaporated milk already had less fat than cream, I knew temperature would be crucial.
Step 3: Get Ready to Whip
After removing everything from the freezer, I opened the can and poured the chilled evaporated milk into the frosty bowl.
At first glance, it looked exactly like thick milk. Nothing about it suggested it would transform into anything remotely similar to whipped cream.
The First Few Minutes
I turned on my electric mixer and began beating the evaporated milk at medium speed.
For the first two minutes, not much happened. The liquid swirled around the bowl, looking slightly frothy but still very thin.
At this point, I started to doubt the experiment.
Heavy cream usually begins thickening fairly quickly, but evaporated milk seemed determined to remain a liquid.
Still, I kept mixing.
Minute Four: The Transformation Begins
Around the fourth minute, something surprising happened.
The surface became noticeably foamier, and tiny bubbles started appearing throughout the mixture. The volume increased slightly, and the milk began looking lighter in color.
It wasn’t whipped cream yet, but it was definitely changing.
The increased aeration suggested that the cold temperature was helping the milk trap air.
Minute Six: Growing Hope
By the six-minute mark, the mixture had nearly doubled in volume.
The texture resembled melted ice cream or a very soft mousse. It was still softer than traditional whipped cream, but it had developed body and structure.
This was far beyond what I expected.
The evaporated milk was actually holding air and creating a light, fluffy consistency.
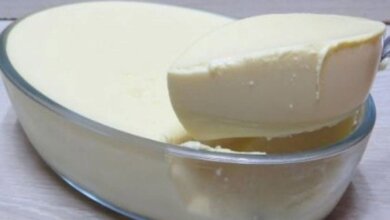
Minute Ten: Success!
At the ten-minute mark, I stopped the mixer and examined the results.
To my surprise, the evaporated milk had transformed into a fluffy, cloud-like topping. It wasn’t quite as stiff or luxurious as whipped heavy cream, but it was remarkably close.
The mixture formed soft peaks and maintained its shape for several minutes.
For a product that started as canned milk, the transformation felt almost magical.
Improving the Flavor
While the texture was impressive, evaporated milk has a slightly different taste than heavy cream.
To enhance the flavor, I added:
2 tablespoons powdered sugar
1 teaspoon vanilla extract
After another minute of mixing, the topping became sweeter, more aromatic, and much closer to traditional whipped cream.
The vanilla masked some of the cooked milk flavor that evaporated milk naturally develops during processing.
The Taste Test
The real question remained:
Would anyone actually enjoy eating it?
I spooned some onto fresh strawberries and took a bite.
The result was surprisingly delicious.
The topping was:
Light and airy
Mildly sweet
Creamy without feeling heavy
Refreshingly different from traditional whipped cream
It paired beautifully with fruit and would work wonderfully on cakes, puddings, and other desserts.
How Does It Compare to Heavy Cream?
Here’s an honest comparison:
Heavy Whipping Cream
Rich and luxurious
Stable for long periods
Holds stiff peaks
Ideal for decorating cakes
Whipped Evaporated Milk
Lower in fat
Budget-friendly
Pantry staple
Surprisingly fluffy
Great for lighter desserts
Less stable over time
Softer peaks
Slightly different flavor
For casual desserts, evaporated milk performs far better than most people expect.
Why This Works
The science behind the trick is fascinating.
When evaporated milk becomes extremely cold, some of its proteins and milk solids help stabilize air bubbles during whipping.
Although it lacks the fat needed for classic whipped cream, the concentrated proteins provide enough structure to create a foamy, whipped texture.
The colder the milk, the better the results.
Tips for Best Results
If you’d like to try this yourself, follow these tips:
1. Chill Thoroughly
The colder the evaporated milk, the better it whips.
2. Freeze Your Bowl
A cold bowl helps maintain the low temperature during mixing.
3. Use an Electric Mixer
Hand whisking is possible but much more difficult.
4. Add Sweeteners After Thickening
Wait until the mixture begins to foam before adding sugar or flavorings.
5. Use Immediately
Whipped evaporated milk is best served shortly after preparation.
Final Verdict
After ten minutes of mixing, I was genuinely impressed. What started as a simple can of evaporated milk became a light, fluffy topping that looked and tasted far better than expected.
Will it completely replace heavy whipping cream? Probably not.
But when you’re out of cream, looking for a lighter alternative, or simply love discovering clever kitchen hacks, this trick is absolutely worth trying.
Sometimes the most surprising culinary successes come from the ingredients already sitting quietly in your pantry. One freezing cold can of evaporated milk proved exactly that.